Friday, February 8, 2013

Citrix StoreFront configuration


Copy pasted from: 
http://citrixsolutions.blogspot.com/2012/04/receiver-storefront-10-step-by-step.html
Refer to original link for more solutions.

This article will show how to quickly create a StoreFront 1.0 Proof Of Concept.
As per Citrix eDocs:
“Receiver Storefront provides authentication and resource delivery infrastructure for Citrix Receiver, enabling you to create centralized enterprise stores to deliver desktops, applications, and other services to users on any device, anywhere.”
Source: Citrix eDocs
The StoreFront is a component of the new Citrix CloudGateway Express and Enterprise infrastructures; it provides authentication and content delivery (XenApp apps, XenDesktop desktops, SaaS…) to Citrix Receivers for any device and platform.
StoreFront will be the replacement of what we now call the Web Interface; indeed, the WI should be replaced by all customers by 2015. StoreFront gives users the opportunity to choose which applications to have in their ‘home page’. Such information are stored in the StoreFront DB and roams along with users between different devices and OSs. In this way, users will have their settings following them on every device, everywhere.
This article is intended to show how to quickly create a POC and not how to install it in a production environment.
This Guide is divided into three parts:
  • 1 – StoreFront Installation;
  • 2 – StoreFront Configuration – HTTP;
  • 3 – StoreFront Configuration – HTTPS.
As you might know, by default the latest Citrix Receiver will not connect to a non-secure service site, that’s why I included the HTTPS configuration part. Anyway, if you are interested in allowing http access instead of https, you can give a look at this article:geekshangout.com.

1 – StoreFront Installation

Prerequisites: the most important prerequisite is SQL Express, for the others take a look at Citrix eDocs!
1) First of all download the software installer from Citrix.com and save it on your server;
      image
      2) Double click on the icon, accept the license agreement and click Next:
      image
      image
      image
      3) The IIS role will be installed automatically, click Next and then Install:
      image
      image
      image
      image
      4) Click on Finish when the installation completes, you will be redirected to the Citrix Receiver StoreFront Console.
       2 – StoreFront Configuration – HTTP
      We will now go through the configuration of StoreFront as an HTTP site;
      1) In the console select ‘Deploy a single server’:
      image
      2) Type in the server URL you want to use and click Create:
      image
      3) Now we have to create an authentication service for the site, to do that click Create Service in the Authentication box:
      image
      4) Select the authentication method you want to use and click Create:
      image
      image
      5) Now we have to create a store for the site, which is a container of applications and desktops; click on Create Store and enter the name you wish to use:
      image
      image
      6) Now enter the information of the XenApp or XenDesktop farms you want to configure and click on Create; if you need to, you can add more farms later:
      image
      image
      7) Now click on Create Site in the ‘Receiver for Web’ box in order to create a ‘Web Site’ which will provide the ‘Web Receiver’ feature to users:
      image
      8) Click on the link provided to see the web receiver page and then on finish. Your site is now alive!
      image
      image
      9) Insert your User name and Password and Log On:
      image
      image
      10) Click on Add Apps and chose the applications/desktops you want to have on your personal page:
      image
      image
      11) On your home page you will see the apps you chose, just click on one of them to launch it!
      12) From this page you can automatically activate (that is, configure) the receiver installed on your device; to do that click on the ‘Activate Citrix Receiver for your Desktop’ and select Activate:
      image
      image
      13) Click open on the IE alert:
      image
      This is the content of the file:

      3842074174
      Your DesktApp Desktop
      http://cg01/Citrix/YourDesktAppDesktop/discovery


      It’s actually an XML file which instructs the Citrix Receiver on how to connect to the store.
       3 – StoreFront Configuration – HTTPS
      We will now go through the configuration of StoreFront as an HTTPS site. In order to do that, you have to bind the HTTPS protocol (along with a valid server certificate) to your Default Web Site in the IIS management console. Once that is done, you can proceed with the following tasks (which are exactly the same as for the HTTP configuration):
      1) Start the deployment process and choose ‘Deploy a single server’:
      image
      2) Then create the authentication service:
      image
      image
      image
      3) Then create the store:
      image
      image
      image
      4) And then the HTTPS web site:
      image
      image
      image
      Your site is now configured to be accessed through HTTPS!!!

      Thursday, April 19, 2012

      Increase logging in ADFS

      1), Log on to the core AD FS 2.0 server.
       2), Select start-All Programs-Administrative Tools- AD FS 2.0 Management.
       3), Select Action- Edit Federation Service Properties.
       4), Select the Events tab and fill in all of the checkboxes, you may need to enable auditing base in Local Security Policy as notes mentions.

      Office 365 Planning

      Copy-pasted from - http://howdouc.blogspot.com/2011/04/active-directory-federation-services.html

      Active Directory Federation Services (ADFS) 2.0 with Office 365: Part 1 – Planning

      This subject will be looking at what ADFS is, what are the environmental requirements, and how to configure it with Office 365. Note: this post is based on the Office 365 Beta for Enterprises. The post will be split into the following two parts:
      Office 365 supports identity federation which allows true single sign-on capabilities. This is achieved through Active Directory Federation Services (ADFS) 2.0. With identity federation, users can enter their Active Directory credentials to access Office 365 services.
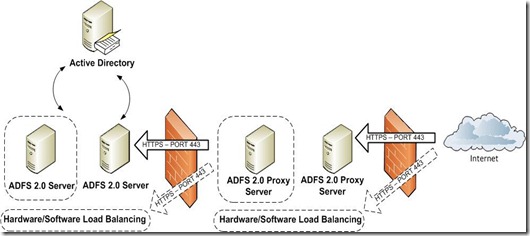
      An ADFS 2.0 solution consists of the following components:
      • ADFS server(s) (internal network joined to AD forest)
      • ADFS Proxy Server(s) (perimeter network used to support remote users)
      ADFS
      There are three basic ADFS 2.0 deployment options for Office 365 with differing levels of access and availability:
      1. Single server configuration
      2. ADFS 2.0 server farm and load-balancer
      3. ADFS 2.0 Proxy server(s) for offsite users
      Benefits of implementing ADFS:
      • Improves user productivity by enabling true single sign-on to domain joined computers
      • Reduces usability issues by allowing users to use AD credentials to access all Office 365 services and not have to remember two identities and two passwords
      • Allows administrators the ability to enforce the organization’s password policies and account restrictions in both the on-premises and cloud-based organizations
      • Increases security of AD credentials since passwords are never synced to the cloud, all authentication happens on-premises
      • Reduces overall administration time and costs associated due to the above points
      The following are different sign-on experiences when using Federated Identity depending on location and status of computer:
      Environment Sign-in Experience
      Outlook 2010 on Windows 7 No prompt***
      Outlook 2007 on Windows 7 Sign in each session*
      Outlook 2010/2007 on Windows Vista or XP Sign in each session**
      Exchange ActiveSync Sign in each session**
      POP, IMAP Sign in each session**
      Web Experiences: Office 365 Portal, Outlook Web App, SharePoint Online, Office Web Apps No prompt
      Office 2010/2007 using SharePoint Online No prompt
      Lync Online No prompt
      Outlook for Mac 2001 Sign in each session**
      * – Outlook 2007 will be updated after Office 365 has been made generally available to have same experience as Outlook 2010 on Windows 7
      ** – When first prompted, you can save your password for future use.  You will not receive another prompt until you change the password
      *** – In beta period, you will be prompted when first accessing the services
      Authentication Mechanisms when using Federated Identity:
      Application Authentication Mechanism
      Web browser Web sign in, WS-Trust and WS-Federation (ADFS 2.0)
      Outlook 2010 on Windows 7 Web sign in, WS-Trust and WS-Federation (ADFS 2.0)
      Outlook 2007 on Windows 7 Basic over SSL, authenticated via the ADFS 2.0 proxy
      Outlook 2010/2007 on Windows Vista and XP Basic over SSL, authenticated via the ADFS 2.0 proxy
      Exchange ActiveSync Basic over SSL, authenticated via the ADFS 2.0 proxy
      POP/IMAP/SMTP client Basic over SSL, authenticated via the ADFS 2.0 proxy
      Lync Online Web sign in, WS-Trust and WS-Federation (ADFS 2.0)
      Note that Outlook 2007 is planned to be backported to support WS-Trust and WS-Federation after the beta period.
      Two-Factor Authentication can be achieved for Office 365.  The Office 365 Beta Identity Service Description describes the requirements.
      The following are requirements of ADFS 2.0:
      • Microsoft Online Services Directory Synchronization tool (DirSync) is installed
      • ADFS servers must have Windows 2008 or Windows 2008 R2 Server operating system installed
      • Client computers must be running the latest updates of Windows 7, Windows Vista, or Windows XP (running the Office 365 Desktop Setup from the Office 365 portal will automatically install necessary updates)
      • Public SSL certificate to secure traffic associated with ADFS
      • Microsoft Online Services Identity Federation Management Tool to establish trust with Office 365
      Capacity Planning
      When identity federation is enabled and configured in Office 365 there is no fall-back to a different form of authentication if ADFS servers fail. This means that if ADFS servers are not available, users will not be able to authenticate with Office 365 servers. It is very important to configure a highly available ADFS solution utilizing multiple servers and hardware or software load balancing. It is also critical to implement a monitoring solution for the ADFS servers. This includes both the internal ADFS servers and the ADFS proxy servers.
      Namespace Planning
      ADFS currently only allows for one namespace per ADFS farm/instance. If your company will support multiple namespaces for authentication, you will need to implement an ADFS infrastructure for each. Only internet routable domains that have been validated within Office 365 can be used in an ADFS deployment. If your organization has a non-routable domain for the AD infrastructure (such as .local, .priv, etc), you will need to add a UserPrincipalName (UPN) suffix in AD and configure each user with that UPN suffix (discussed in Part 2).
      Summary
      Part 1 of this post introduced ADFS 2.0 in relation to Office 365 and discussed environmental requirements required to implement.  Part 2 will walk through the configuration of ADFS 2.0 and Office 365.
      References:

      ADFS configuration for Office 365

      Copy-pasted from blog - http://howdouc.blogspot.com/2011/04/active-directory-federation-services_11.html


      Active Directory Federation Services (ADFS) 2.0 with Office 365: Part 2 – Configuring

      In Part 1 of this post, we introduced ADFS 2.0 in relation to Office 365 and discussed environmental requirements in implement. Part 2 will actually cover the configuration and validation steps needed to implement ADFS 2.0 with Office 365. Note: this post is based on the Office 365 Beta for Enterprises.
      Assumptions:
      • Domain has been added and verified in the Office 365 Admin portal
      • Directory Sync Tool is installed and configured
      • 2 Windows 2008 R2 servers are built and prepared to install ADFS 2.0
        • Internal ADFS server is joined to the domain
        • Proxy ADFS server is not joined to domain and located in perimeter network
      • Necessary firewall ports are open from the Internet to ADFS Proxy server (port 443)
      • Necessary firewall ports are open from ADFS Proxy server to internal ADFS server (port 443)
      • External DNS record has been implemented for ADFS (our example will use sts.UPNdomain.com)
      The following steps are used to prepare the environment:
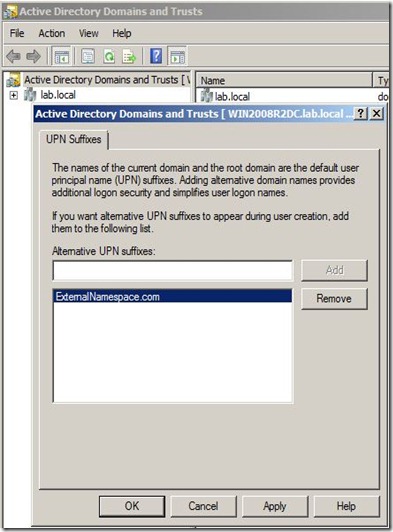
      1. Add UPN Suffix to AD and configure for each user (this is required if your AD is using a non-routable domain internally like .local or .priv)
        • UPNs used for identity federation can only contain letters, numbers, periods, dashes and underscores.
        • Open AD Domains and Trusts tool
        • Right-click AD Domains and Trusts and click Properties
        • On the UPN suffixes tab, type the alternative UPN suffix for the forest and then click Add
        • UPNSuffix
        • Repeat to add additional UPN suffixes
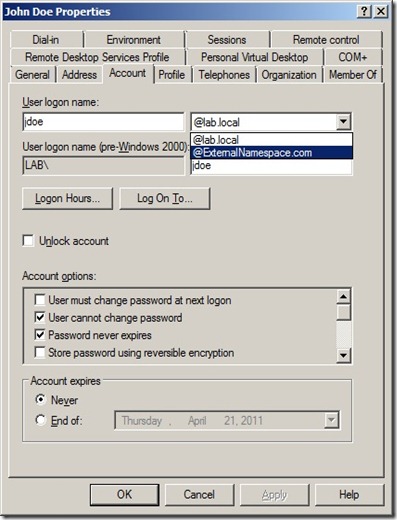
        • Open user properties, navigate to Account Tab.
        • Select the external namespace UPN for the “User logon name”
        • UPN-Account
      2. Create service account for ADFS – this can be a regular Domain User, no special permissions needed.
      3. Add internal ADFS server(s) to AD forest
      4. Download ADFS 2.0 RTW (HERE). During the install process, the following Windows components will be automatically installed:
        • Windows PowerShell
        • .NET Framework 3.5 SP1
        • Internet Information Services (IIS)
        • Windows Identity Foundation
      5. Download Microsoft Online Services Identity Federation Management Tool (32-bit or 64-bit)
      6. (Optional) Install and configure SQL Server 2005 or 2008 if your organization has more than 30,000 users who will use Office 365
      7. Configure external DNS A record for ADFS Proxy (ex. Sts.domain.com)
      Now we are ready to install and configure ADFS 2.0 on internal server:
      1. Double-click AdfsSetup.exe (this is the ADFS 2.0 RTW download)
      2. Click Next on the Welcome Screen and Accept the License Agreement
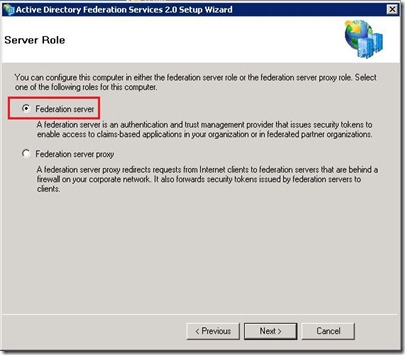
      3. On the Server Role Option screen, select Federation Server
        • ADFS - Role select - ADFS Server - markup
      4. Finish the rest of the wizard, this will install any necessary prerequisites
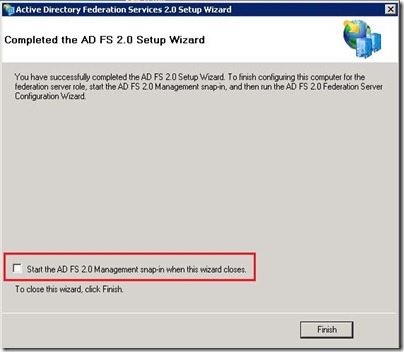
      5. At the end of the wizard, uncheck box to Start the ADFS 2.0 Management Snap-in
        • ADFS - install - uncheck box - markup
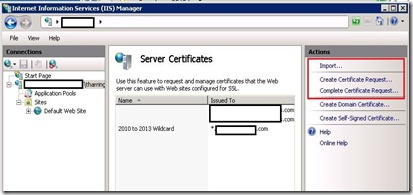
      6. Request and provision public certificate through IIS
        • ADFS - IIS - cert request - markup
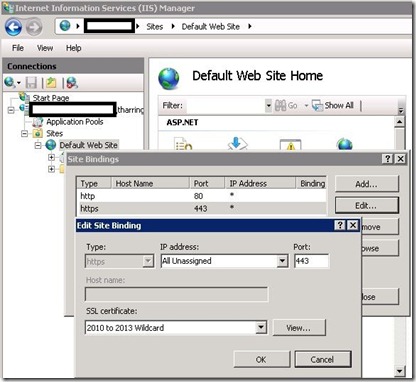
      7. Bind certificate to IIS on port 443
        • ADFS - IIS - bind - markup
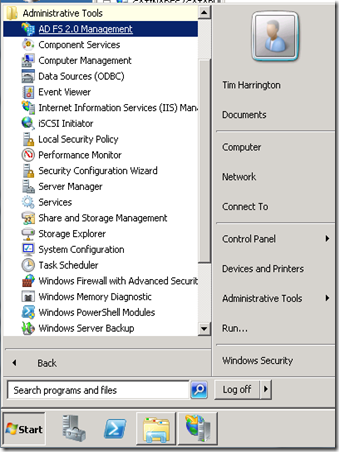
      8. Configure ADFS utilizing ADFS 2.0 Management
        • ADFS - start management tool
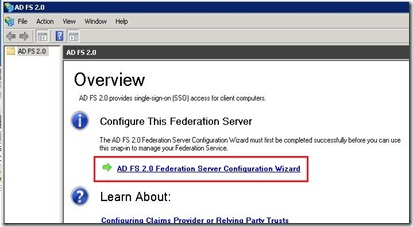
      9. Select ADFS 2.0 Federation Server Configuration Wizard
        • ADFS - management - wizard start - markup
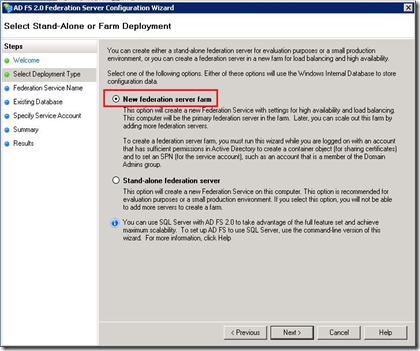
      10. Select Create a new Federation Service
      11. Select New Federation server farm (this is recommended even if you plan on installing only one server in case in the future you want to add another server)
        • ADFS - management - wizard - farm - markup
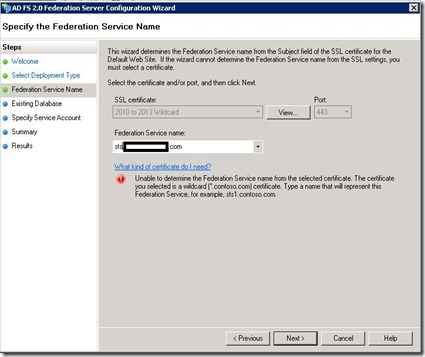
      12. Select the public certificate and validate the Federation Service name.  This will automatically fill in the name on the certificate Subject Name.  If a wildcard certificate is used, you must enter the name for the Federation Service.
        • ADFS - management - wizard - name - markup
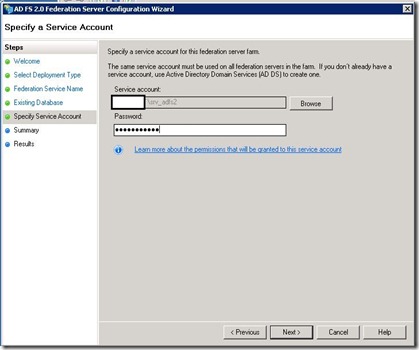
      13. Enter in the service account credentials that were created earlier
        • ADFS - management - wizard - service account - markup
      14. Finish Wizard
      15. Run Office 365 Desktop Setup from portal
      16. Install Identity Federation Management Tool (FederationConfig.msi, use default install parameters)
      17. Enable Identity Federation within Office 365 portal for your domain
      18. Launch the Identity Federation Management Tool
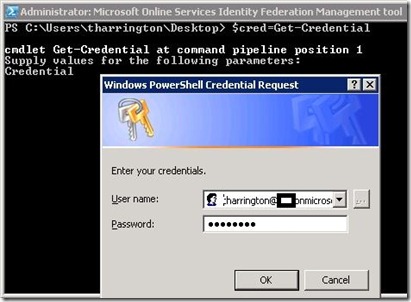
      19. Type $cred=Get-Credential and press Enter
      20. Enter you Microsoft Online Services administrator logon and password and click ok
        • ADFS - Fed tool - creds - markup
      21. Type Set-MSOLContextcredential –msolAdminCredentials $cred –LogFile c:\logfile.log and press enter
      22. Type Add-MSOLFederatedDomain –domainname UPNdomain.com
      23. If prompted that the domain already exists as a standard domain, type Convert-MSOLDomainToFederated –domainname UPNdomain.com
      24. Type Update-MSOLFederatedDomain –domainname UPNdomain.com
      25. Verify Identity Federation Functionality
      Install ADFS 2.0 Proxy server
      1. Export public certificate from ADFS internal server and copy to proxy server
      2. Validate DNS resolution of sts.UPNdomain.com resolves to internal ADFS server from ADFS Proxy Server (a HOST file can be used for this if needed)
      3. Validate DNS resolution of sts.UPNdomain.com resolves to external A record from an internet PC
      4. Double-click AdfsSetup.exe (this is the ADFS 2.0 RTW download)
      5. Click Next on the Welcome Screen and Accept the License Agreement
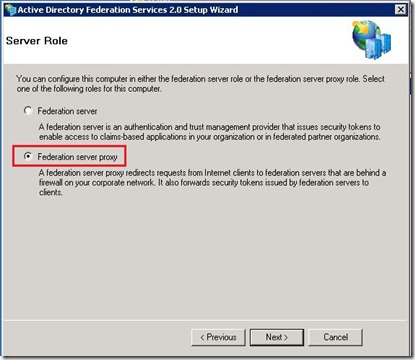
      6. On the Server Role Option screen, select Federation Server Proxy
        • ADFS - Role select - ADFS Proxy Server - markup
      7. Finish the rest of the wizard, this will install any necessary prerequisites
      8. At the end of the wizard, uncheck box to Start the ADFS 2.0 Management Snap-in
        • ADFS - install - uncheck box - markup
      9. Import certificate in IIS and bind certificate to Default Web Site
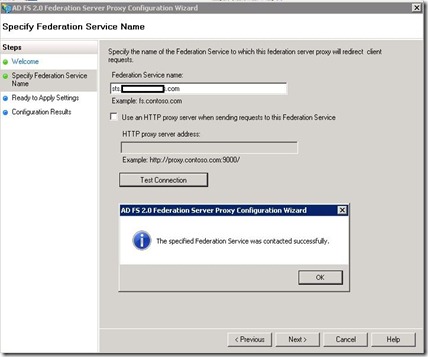
      10. Configure ADFS proxy by selecting ADFS 2.0 Federation Server Proxy Configuration Wizard
        • Enter the federation namespace (ex. Sts.UPNdomain.com)
        • Test connection
        • adfs - proxy - wiz - test conn - markup
        • Service account credentials
      11. Finish Wizard
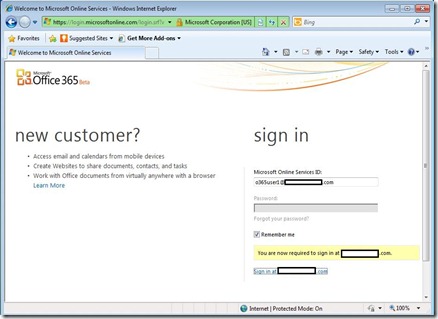
      12. Log into portal with UPN credentials.  Note that once the UPN login is entered, the password field is grayed out and a link activates to log into the ADFS server
        • ADFS - portal - signin - markup
      Hopefully this will help you navigate the ADFS waters in regards to Office 365 Beta.