Thursday, April 19, 2012

Increase logging in ADFS

1), Log on to the core AD FS 2.0 server.
 2), Select start-All Programs-Administrative Tools- AD FS 2.0 Management.
 3), Select Action- Edit Federation Service Properties.
 4), Select the Events tab and fill in all of the checkboxes, you may need to enable auditing base in Local Security Policy as notes mentions.

Office 365 Planning

Copy-pasted from - http://howdouc.blogspot.com/2011/04/active-directory-federation-services.html

Active Directory Federation Services (ADFS) 2.0 with Office 365: Part 1 – Planning

This subject will be looking at what ADFS is, what are the environmental requirements, and how to configure it with Office 365. Note: this post is based on the Office 365 Beta for Enterprises. The post will be split into the following two parts:
Office 365 supports identity federation which allows true single sign-on capabilities. This is achieved through Active Directory Federation Services (ADFS) 2.0. With identity federation, users can enter their Active Directory credentials to access Office 365 services.
An ADFS 2.0 solution consists of the following components:
  • ADFS server(s) (internal network joined to AD forest)
  • ADFS Proxy Server(s) (perimeter network used to support remote users)
ADFS
There are three basic ADFS 2.0 deployment options for Office 365 with differing levels of access and availability:
  1. Single server configuration
  2. ADFS 2.0 server farm and load-balancer
  3. ADFS 2.0 Proxy server(s) for offsite users
Benefits of implementing ADFS:
  • Improves user productivity by enabling true single sign-on to domain joined computers
  • Reduces usability issues by allowing users to use AD credentials to access all Office 365 services and not have to remember two identities and two passwords
  • Allows administrators the ability to enforce the organization’s password policies and account restrictions in both the on-premises and cloud-based organizations
  • Increases security of AD credentials since passwords are never synced to the cloud, all authentication happens on-premises
  • Reduces overall administration time and costs associated due to the above points
The following are different sign-on experiences when using Federated Identity depending on location and status of computer:
Environment Sign-in Experience
Outlook 2010 on Windows 7 No prompt***
Outlook 2007 on Windows 7 Sign in each session*
Outlook 2010/2007 on Windows Vista or XP Sign in each session**
Exchange ActiveSync Sign in each session**
POP, IMAP Sign in each session**
Web Experiences: Office 365 Portal, Outlook Web App, SharePoint Online, Office Web Apps No prompt
Office 2010/2007 using SharePoint Online No prompt
Lync Online No prompt
Outlook for Mac 2001 Sign in each session**
* – Outlook 2007 will be updated after Office 365 has been made generally available to have same experience as Outlook 2010 on Windows 7
** – When first prompted, you can save your password for future use.  You will not receive another prompt until you change the password
*** – In beta period, you will be prompted when first accessing the services
Authentication Mechanisms when using Federated Identity:
Application Authentication Mechanism
Web browser Web sign in, WS-Trust and WS-Federation (ADFS 2.0)
Outlook 2010 on Windows 7 Web sign in, WS-Trust and WS-Federation (ADFS 2.0)
Outlook 2007 on Windows 7 Basic over SSL, authenticated via the ADFS 2.0 proxy
Outlook 2010/2007 on Windows Vista and XP Basic over SSL, authenticated via the ADFS 2.0 proxy
Exchange ActiveSync Basic over SSL, authenticated via the ADFS 2.0 proxy
POP/IMAP/SMTP client Basic over SSL, authenticated via the ADFS 2.0 proxy
Lync Online Web sign in, WS-Trust and WS-Federation (ADFS 2.0)
Note that Outlook 2007 is planned to be backported to support WS-Trust and WS-Federation after the beta period.
Two-Factor Authentication can be achieved for Office 365.  The Office 365 Beta Identity Service Description describes the requirements.
The following are requirements of ADFS 2.0:
  • Microsoft Online Services Directory Synchronization tool (DirSync) is installed
  • ADFS servers must have Windows 2008 or Windows 2008 R2 Server operating system installed
  • Client computers must be running the latest updates of Windows 7, Windows Vista, or Windows XP (running the Office 365 Desktop Setup from the Office 365 portal will automatically install necessary updates)
  • Public SSL certificate to secure traffic associated with ADFS
  • Microsoft Online Services Identity Federation Management Tool to establish trust with Office 365
Capacity Planning
When identity federation is enabled and configured in Office 365 there is no fall-back to a different form of authentication if ADFS servers fail. This means that if ADFS servers are not available, users will not be able to authenticate with Office 365 servers. It is very important to configure a highly available ADFS solution utilizing multiple servers and hardware or software load balancing. It is also critical to implement a monitoring solution for the ADFS servers. This includes both the internal ADFS servers and the ADFS proxy servers.
Namespace Planning
ADFS currently only allows for one namespace per ADFS farm/instance. If your company will support multiple namespaces for authentication, you will need to implement an ADFS infrastructure for each. Only internet routable domains that have been validated within Office 365 can be used in an ADFS deployment. If your organization has a non-routable domain for the AD infrastructure (such as .local, .priv, etc), you will need to add a UserPrincipalName (UPN) suffix in AD and configure each user with that UPN suffix (discussed in Part 2).
Summary
Part 1 of this post introduced ADFS 2.0 in relation to Office 365 and discussed environmental requirements required to implement.  Part 2 will walk through the configuration of ADFS 2.0 and Office 365.
References:

ADFS configuration for Office 365

Copy-pasted from blog - http://howdouc.blogspot.com/2011/04/active-directory-federation-services_11.html


Active Directory Federation Services (ADFS) 2.0 with Office 365: Part 2 – Configuring

In Part 1 of this post, we introduced ADFS 2.0 in relation to Office 365 and discussed environmental requirements in implement. Part 2 will actually cover the configuration and validation steps needed to implement ADFS 2.0 with Office 365. Note: this post is based on the Office 365 Beta for Enterprises.
Assumptions:
  • Domain has been added and verified in the Office 365 Admin portal
  • Directory Sync Tool is installed and configured
  • 2 Windows 2008 R2 servers are built and prepared to install ADFS 2.0
    • Internal ADFS server is joined to the domain
    • Proxy ADFS server is not joined to domain and located in perimeter network
  • Necessary firewall ports are open from the Internet to ADFS Proxy server (port 443)
  • Necessary firewall ports are open from ADFS Proxy server to internal ADFS server (port 443)
  • External DNS record has been implemented for ADFS (our example will use sts.UPNdomain.com)
The following steps are used to prepare the environment:
  1. Add UPN Suffix to AD and configure for each user (this is required if your AD is using a non-routable domain internally like .local or .priv)
    • UPNs used for identity federation can only contain letters, numbers, periods, dashes and underscores.
    • Open AD Domains and Trusts tool
    • Right-click AD Domains and Trusts and click Properties
    • On the UPN suffixes tab, type the alternative UPN suffix for the forest and then click Add
    • UPNSuffix
    • Repeat to add additional UPN suffixes
    • Open user properties, navigate to Account Tab.
    • Select the external namespace UPN for the “User logon name”
    • UPN-Account
  2. Create service account for ADFS – this can be a regular Domain User, no special permissions needed.
  3. Add internal ADFS server(s) to AD forest
  4. Download ADFS 2.0 RTW (HERE). During the install process, the following Windows components will be automatically installed:
    • Windows PowerShell
    • .NET Framework 3.5 SP1
    • Internet Information Services (IIS)
    • Windows Identity Foundation
  5. Download Microsoft Online Services Identity Federation Management Tool (32-bit or 64-bit)
  6. (Optional) Install and configure SQL Server 2005 or 2008 if your organization has more than 30,000 users who will use Office 365
  7. Configure external DNS A record for ADFS Proxy (ex. Sts.domain.com)
Now we are ready to install and configure ADFS 2.0 on internal server:
  1. Double-click AdfsSetup.exe (this is the ADFS 2.0 RTW download)
  2. Click Next on the Welcome Screen and Accept the License Agreement
  3. On the Server Role Option screen, select Federation Server
    • ADFS - Role select - ADFS Server - markup
  4. Finish the rest of the wizard, this will install any necessary prerequisites
  5. At the end of the wizard, uncheck box to Start the ADFS 2.0 Management Snap-in
    • ADFS - install - uncheck box - markup
  6. Request and provision public certificate through IIS
    • ADFS - IIS - cert request - markup
  7. Bind certificate to IIS on port 443
    • ADFS - IIS - bind - markup
  8. Configure ADFS utilizing ADFS 2.0 Management
    • ADFS - start management tool
  9. Select ADFS 2.0 Federation Server Configuration Wizard
    • ADFS - management - wizard start - markup
  10. Select Create a new Federation Service
  11. Select New Federation server farm (this is recommended even if you plan on installing only one server in case in the future you want to add another server)
    • ADFS - management - wizard - farm - markup
  12. Select the public certificate and validate the Federation Service name.  This will automatically fill in the name on the certificate Subject Name.  If a wildcard certificate is used, you must enter the name for the Federation Service.
    • ADFS - management - wizard - name - markup
  13. Enter in the service account credentials that were created earlier
    • ADFS - management - wizard - service account - markup
  14. Finish Wizard
  15. Run Office 365 Desktop Setup from portal
  16. Install Identity Federation Management Tool (FederationConfig.msi, use default install parameters)
  17. Enable Identity Federation within Office 365 portal for your domain
  18. Launch the Identity Federation Management Tool
  19. Type $cred=Get-Credential and press Enter
  20. Enter you Microsoft Online Services administrator logon and password and click ok
    • ADFS - Fed tool - creds - markup
  21. Type Set-MSOLContextcredential –msolAdminCredentials $cred –LogFile c:\logfile.log and press enter
  22. Type Add-MSOLFederatedDomain –domainname UPNdomain.com
  23. If prompted that the domain already exists as a standard domain, type Convert-MSOLDomainToFederated –domainname UPNdomain.com
  24. Type Update-MSOLFederatedDomain –domainname UPNdomain.com
  25. Verify Identity Federation Functionality
Install ADFS 2.0 Proxy server
  1. Export public certificate from ADFS internal server and copy to proxy server
  2. Validate DNS resolution of sts.UPNdomain.com resolves to internal ADFS server from ADFS Proxy Server (a HOST file can be used for this if needed)
  3. Validate DNS resolution of sts.UPNdomain.com resolves to external A record from an internet PC
  4. Double-click AdfsSetup.exe (this is the ADFS 2.0 RTW download)
  5. Click Next on the Welcome Screen and Accept the License Agreement
  6. On the Server Role Option screen, select Federation Server Proxy
    • ADFS - Role select - ADFS Proxy Server - markup
  7. Finish the rest of the wizard, this will install any necessary prerequisites
  8. At the end of the wizard, uncheck box to Start the ADFS 2.0 Management Snap-in
    • ADFS - install - uncheck box - markup
  9. Import certificate in IIS and bind certificate to Default Web Site
  10. Configure ADFS proxy by selecting ADFS 2.0 Federation Server Proxy Configuration Wizard
    • Enter the federation namespace (ex. Sts.UPNdomain.com)
    • Test connection
    • adfs - proxy - wiz - test conn - markup
    • Service account credentials
  11. Finish Wizard
  12. Log into portal with UPN credentials.  Note that once the UPN login is entered, the password field is grayed out and a link activates to log into the ADFS server
    • ADFS - portal - signin - markup
Hopefully this will help you navigate the ADFS waters in regards to Office 365 Beta. 

Wednesday, April 18, 2012

Monday, April 16, 2012

End-To-End setup for Office 365 - All steps

http://www.slideshare.net/technetbelux/office-365-planning-and-automating-for-hybrid-identity-scenarios-in-the-cloud-a-geeks-guide-to-dir-sync-and-adfs-with-tools-scripts-and-deployment-hydration

Monday, April 2, 2012

Exchange Server Online - Configuration

Use Windows PowerShell to connect to Exchange Online - Link
http://technet.microsoft.com/en-us/exchangelabshelp/cc546278

Install and Configure Windows PowerShell for MS Exchange Online - Link
http://technet.microsoft.com/en-us/exchangelabshelp/cc952756

Changing Users Primary email address - Link
http://technet.microsoft.com/en-us/exchangelabshelp/dd251224

Email sub-domain issue - Link
http://community.office365.com/en-us/f/158/t/44701.aspx

Friday, March 30, 2012

API to get token using WIF

Copy-pasted from blog - http://blogs.southworks.net/mwoloski/2009/07/17/getting-a-token-from-adfs-ex-geneva-server-using-wcf/

I’ve been doing some tests to get a token from ADFS (Geneva Server) using Windows Identity Foundation  WSTrustClient. In this case we are using the UserNameMixed endpoint that expects a WS-Security UsernameToken (notice the MessageCredentialType.UserName).
internal static ClaimsIdentityCollection RequestTokenWithUsernameMixed()
{
    var binding = new WS2007HttpBinding(SecurityMode.TransportWithMessageCredential, false);
    binding.Security.Message.ClientCredentialType = MessageCredentialType.UserName;
    binding.Security.Message.EstablishSecurityContext = false;

    var credentials = new ClientCredentials();
    credentials.UserName.UserName = "Mary";
    credentials.UserName.Password = "Passw0rd!";
    var endpoint = "https://mygenevaserver/Trust/13/UsernameMixed";
    var client = new WSTrustClient(binding, new EndpointAddress(new Uri(endpoint)), TrustVersion.WSTrust13, credentials);

    var request = new RequestSecurityToken();
    request.RequestType = "http://schemas.microsoft.com/idfx/requesttype/issue";
    request.AppliesTo = new EndpointAddress("http://localhost/activerp");
    var token = client.Issue(request) as GenericXmlSecurityToken;

    var claims = token.ToClaimsIdentityCollection(TrustVersion.WSTrust13,                   CertificateUtility.GetCertificate(StoreName.My, StoreLocation.LocalMachine,                   "CN=Geneva Signing Certificate - WIN-66EYOLL2BVY"),                   CertificateUtility.GetCertificate(StoreName.My, StoreLocation.LocalMachine,                   "CN=WMSvc-WIN-66EYOLL2BVY"));

    return claims;
}
Here is another one using the WindowsMixed endpoint (notice the MessageCredentialType.Windows and no username and password set)
internal static ClaimsIdentityCollection RequestTokenWithWindowsMixed()
{
    var binding = new WS2007HttpBinding(SecurityMode.TransportWithMessageCredential, false);
    binding.Security.Message.ClientCredentialType = MessageCredentialType.Windows;
    binding.Security.Message.EstablishSecurityContext = false;

    var credentials = new ClientCredentials();
    var endpoint = "https://mygenevaser/Trust/13/WindowsMixed";
    var client = new WSTrustClient(binding, new EndpointAddress(new Uri(endpoint)), TrustVersion.WSTrust13, credentials);

    var request = new RequestSecurityToken();
    request.RequestType = "http://schemas.microsoft.com/idfx/requesttype/issue";
    request.AppliesTo = new EndpointAddress("http://localhost/activerp");
    var token = client.Issue(request) as GenericXmlSecurityToken;

    var claims = token.ToClaimsIdentityCollection(TrustVersion.WSTrust13,                    CertificateUtility.GetCertificate(StoreName.My, StoreLocation.LocalMachine,                    "CN=Geneva Signing Certificate - WIN-66EYOLL2BVY"),                    CertificateUtility.GetCertificate(StoreName.My, StoreLocation.LocalMachine,                   "CN=WMSvc-WIN-66EYOLL2BVY"));

    return claims;
}
You can use this together with the CreateChannelWithIssuedToken extension method

Tuesday, March 27, 2012

ADFS Sandbox setup

Minimal sandbox ADFS setup for Office 365:
Copy-pasted from the below URL - 
http://www.wapshere.com/missmiis/minimalist-office-365-with-adfs-sandbox

It’s kind of killing my laptop, but I have managed to get my virtual lab environment working with ADFS to an Office 365 trial. I think I’ve probably got the bare minimum config going on here, so for reference, here’s what I had to do.

Ingredients

  • A host computer – in my case my Win7 laptop running Oracle VirtualBox,
  • An Office 365 trial,
  • A real live domain name that is resolvable on the internet and which you (or someone who likes you) has admin access to (this will be necessary for the verification process),
  • A SSL certificate for said domain name,
  • The following VMs:
    • DC + ADFS: Win2008R2, 1024 MB of RAM (I couldn’t get ADFS to install with only 512MB), virtual network and internet access
    • DirSync: Win2008x32, 512 MB of RAM, virtual network and internet access
    • Workstation: Win7, 512 MB of RAM, virtual network and internet access
Note: there is now a 64 bit version of DirSync so it should be possible to install that on the DC as well.

AD

The name of my virtual AD domain did not match the external domain I had to use for ADFS. This does not matter – just add the external domain as a UPN suffix to AD.
You then also need to make sure any account you want to test with has a UPN of accountname@myrealdomain.com.

Certificate

I was under the impression that I’d need a public cert so Microsoft would trust my ADFS server, so I got a free one month cert from freessl. However I can see now that the cert is only used for internal communication between my ADFS server and my client, so I think now if I’d generated one in my own CA it would have been fine. The only provisio is the name of the cert must match myrealdomain.com.

ADFS

The instructions walk you through a proper setup with NLB and federation proxies. With a laptop lab I did none of this. I just have the one federation server running on my DC. Pretty much all I did was:
  1. Installed ADFS – make sure you choose “first server in a farm”,
  2. Installed the SSL certificate for myrealdomain.com onto the default IIS website,
  3. Ran the ADFS wizard,
  4. Ran the powershell cmdlets to add and federate the domain in Office 365 (documentation).

Internet Firewall

Another thing I was mistaken about was thinking the Microsoft Federation gateway would need to talk directly to my ADFS server but actually it doesn’t – the communication is between the client browser and ADFS. I’m not allowing external devices to access Office 365 via my lab, so I don’t need to grant access to my ADFS VM through the network firewall. Which is a relief!

DNS

The domain myrealdomain.com has a real, live ip address on the internet, however in my virtual network I want it to resolve to the internal ip address of my ADFS server. To do this I:
  • Created a Primary Zone for myrealdomain.com in my domain’s DNS service,
  • Created an A record in the zone pointing to the internal ip address of the ADFS server,
  • Set a forwarder to the external DNS server, and
  • Made sure all VMs in my virtual network used the virtual DC for DNS, rather than going straight to the external DNS.

DirSync

As I noted above, when I wrote this article there was only 32 bit DirSync. Now we finally have a 64 bit version. It should run on the DC but I haven’t tried it.
DirSync is damn easy to install. Just follow the instructions.

Activate an account

Once you have accounts DirSync’d up to Office 365, with the correct UPN matching the real domain that you federated, you can now activate one or two of them to use as tests.

Test

To test I logged in to my virtual workstation. This has a bridged internet connection in addition to the virtual network connection, and all DNS goes via the virtual DC.
I went to https://portal.microsoftonline.com and entered the user’s UPN. When I clicked the Password box it was greyed out and a link appeared telling me to authenticate against myrealdomain.com. I clicked this link and, after a few URL changes flicked across the address bar, I’m in!

Troubleshooting

The main mistake I made was to install the ADFS server in standalone mode the first time. Login actually worked, but it wasn’t SSO – the user had to re-enter their username and password. Checking the Security log on the DC showed NTLM auth being used.
So I re-ran the ADFS wizard (as the link had dissappeared from the Mnagement console I ran C:\Program Files\Active Directory Federation Services 2.0\FsConfigWizard.exe) and chose server farm. I then re-ran the powershell cmdlet Convert-MsolDomainToFederated.
Everything looked good, but wasn’t. I kept getting “Your organization could not sign you in to this service”. In the event logs I could actually see the user successfully logging in with Kerberos, but at the same time a KDC_ERR_BADOPTION error.
After much troubleshooting and hair-tearing I decided to run the powershell cmdlet Update-MsolFederatedDomain – and it fixed the problem!
As I’d had the foresight to run a Get-MsolFederationProperty both before and after the Update cmdlet I could actually compare and see what changed. The problem was the TokenSigningCertificate – it looks like the Convert cmdlet did not overwrite this so it still had the old thumbprint. After I ran Update the thumbprint changed to the new cert.


Using ADFS to federate your Office 365 domain

Copy-Pasted from the following link:
http://360on365.com/2011/03/04/how-to-federate-your-domain-with-office365/

HOW TO: Federate your domain with #Office365

by In the last posts we talked about the enduser experience when using federation. But how do we ‘Administrators’ set it up? Before you start clicking you should remember one very important thing and that is the Active Directory preparation. A lot of companies have their Active Directory domain ending on .local or some variation to that. When you want to federate with #Office 365, your users can’t logon with that domain name. Because domain.local is not resolvable on the internet.
To solve this issue you should give the AD users a User Principle Name (UPN) suffix that matches the domain you want to federate. For example user@fabrikam.com. A best practice is to use the users emailaddress as his/her UPN. Don’t underestimate this step. Depending on your current environment this will be a separate project.
After AD preparation we continue with the creation of a DNS record for the #ADFS2.0 server. In the internal DNS zone of fabrikam.com, create a host record called ‘sts’ which points to your #ADFS2.0 Server.
Now the preparations are done, we are going to install ADFS2.0. In the Server Manager of Windows Server 2008 R2 you also find a version of ADFS, this is however an old version and should not be used in conjunction with #Office365. You can download the correct version here. After downloading the package, run AdfsSetup.exe. After the License agreement page, you’re asked if you want this to be a Federation or Federation Proxy server. The federation server/farm will be installed on the internal network and the proxy server will be placed in the DMZ. So in our situation we choose for the Federation server and proceed with the automatic installation of the following prerequisites:

Before we configure ADFS, we have to create a new domain certificate for ‘sts.fabrikam.com’ and assign it to the default web site on the ADFS server using IIS Manager.
After we’ve done this, it’s time to configure Active Directory Federation Services 2.0. To do this we will follow these steps:
1. Open ADFS 2.0 Management Console
2. In the results pane click on “ADFS 2.0 Federation Server Configuration Wizard”
3. Choose for “Create a new Federation Service”
4. Choose the type of deployment, Farm or Stand-Alone server.
Note: Always use a ADFS Farm in a production environment. When you use a Stand-Alone server you create a hugh single point of failure!
5. Now verify that the correct SSL certificate (the one just created) and Federation Service name (equal to the common name of the certificate) are specified.
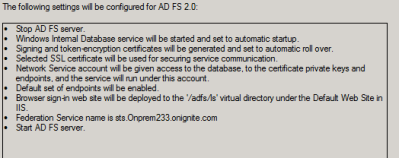
The wizard will show a list of changes like the one shown below:

Configuration changes set by ADFS Configuration Wizard
After we’ve run the wizard we’ve partly configured ADFS. To fully configure ADFS for use with Office 365 the “Microsoft Online Services Identity Federation Management Tool” and “Microsoft Online Services Connector” need to be installed on the ADFS Server.
- The 32-bit version of the identity Federation Management tool can be downloaded here, the 64-bit version here.
- The “Microsoft Online Services Connector” can be downloaded from the Office 365 Beta tenant. (you need your own Beta account for it).
Install both tools and let the ”Services Connector” update your system.  After this step all the preparations are done on the on-premise environment and we can commence the actual federation with Office 365.
The below steps will create a new domain in Office 365 and federate it:
1. Open the Microsoft Online Services Identity Federation Management Tool
2. In the PowerShell window enter: $cred = get-credential (this will show a prompt to enter Office 365 credentials)
3. Enter the Office 365 Admin credentials in the prompt which you want the tool to use for the connection to Office 365
4. Enter:  ”Set-MSOLContextCredential -MSOLAdminCredentials $cred” into the tool
5. Then enter: “Add-MSOLFederatedDomain -DomainName “yourdomain.com”
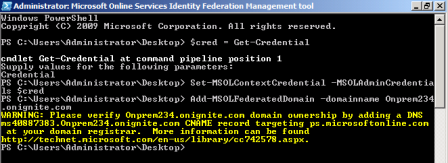
You will see a warning like the one below:
Adding a federated domain
The domain name is now created in Office 365 but it isn’t working yet. First you have to verify that you are the owner of the domain.
This can be done by creating the CNAME record that is shown in the warning you get when performing the 5th step (like the one in the picture above) and point it to ps.microsoftonline.com.
6. Create the CNAME Record in DNS
7. Go back to the Identity Federation Management tool
8. Enter: “Add-MSOLFederatedDomain -DomainName “yourdomain.com” again.
The command in step 8 will read the CNAME record and verify the domainownership. After the domain ownership is verified the domain is federated.
If you would like to review the configuration you can use this command:
Get-MSOLFederationProperty -DomainName “yourdomain.com”
If you already have your domain added to Office365 you have to convert your domain to a federated domain. This can be done by following these steps:
1. Open the Microsoft Online Services Identity Federation Management Tool
2. In the PowerShell window enter: $cred = get-credential (this will show a prompt to enter Office 365 credentials)
3. Enter the Office 365 Admin credentials in the prompt which you want the tool to use for the connection to Office 365
4. Enter:  “Set-MSOLContextCredential -MSOLAdminCredentials $cred” into the tool
5. Then enter: “Convert-MSOLDomainToconverFederated -DomainName “YourdomaininOffice365.com”
After running this command the domain will be changed from a standard authentication to a Federated authentication domain.
This can also be reviewed using the “Get-MSOLFederationProperty” cmdlet.
Have fun federating your domain with Office 365!

Thursday, March 15, 2012

Office 365 Issues

Outlook live : Post Time Out issue - http://microsoftblog.co.in/commerceserver/troubleshoot-post-ticket-time-out-exception-2/

Copy pasted from above link
-----------------------------------
The error "Post ticket time window expired.  Ticket could be reposted" indicates the users ticket is no longer valid.  RPS uses POST TICKET TIME WINDOW to prevent Compact Tickets from being accepted if the difference between Compact Ticket "IssueInstant" and server’s Now() time is more than an amount that you specified in RPSServer.xml.
If it is less, then Compact Ticket is accepted. If it is more, then RPS throws PP_E_RPS_REASON_POST_TICKET_TIMEWINDOW_EXPIRED.
The default value for PostTicketTimeWindow is 300 seconds (5 minutes). This is configurable in the RPSServer.xml (which is actual fix). Apart from this, I have catch this error in the code and redirect the user to the Silent Auth URL to refresh the ticket. Sending the user to the Silent Auth URL with a different CT value (current time – matching your servers time), the login server will issue a new compact ticket. Finally the issue the fixed.

-----------------------------------

Tuesday, March 13, 2012

Configuring trust with Office 365

http://support.microsoft.com/kb/2521057

Friday, March 9, 2012

Using remote PS to manage Office365 Identities

Copied from Blog : http://philwicklund.com/blog/Pages/Using-remote-PowerShell-to-manage-Office-365-identities.aspx
With remote PowerShell you can connect to Office 365 to perform management tasks that are not available or practical in the web management interface. For example, you can use Remote PowerShell to automate repetitive tasks, extract data for custom reports, customize policies, and connect Exchange Online to existing infrastructure and processes. This is especially usefully when you need to perform the same task thousands of times. What would take days through the browser can take minutes with a script. The following is a list of common settings configured with remote PowerShell:
·         User management
·         License assignment
·         Security group management
·         Domain management
·         Admin role assignments
To use Remote PowerShell, your PC must be running the Windows Management Framework, which contains Windows PowerShell v2 and WinRM 2.0. These components are already installed in computers running Windows 7 or Windows Server 2008 R2. You can manually download these components for computers running other operating systems. You do not need to install any Exchange Server management or migration tools in order to use Remote PowerShell, however you will need to download and install the Microsoft Online PowerShell Module.
The Microsoft Online PowerShell Module contains Office 365’s core cmdlets, such as cmdlets to manage users, groups, etc. To download the module use the following links:
To get started, open PowerShell on your PC and run the Import-Module MSOnline cmdlet to load the module you just downloaded and installed. Next, you’ll need to connect to Office 365 using a set of credentials. Use the Get-Credential cmdlet to set your credentials to a variable you can pass into the Connect-MsolService cmdlet . The Connect-MsolService cmdlet passes your credentials to Microsoft Online and sets up the secure connection. Once you’re connected to Microsoft Online, you can start scripting you administrative actions. The figure below shows an example of how to connect to Microsoft Online with PowerShell after you’ve installed the module:
5-14.bmpYou’ll notice in the figure that the Get-MsolUser cmdlet was executed to fetch all the users in Microsoft Online. From a user management perspective there are many cmdlets you can use. The following scenarios will help you add/remove users, reset passwords, add/remove security groups, enable/disable password expiry, and enable/disable password strength requirements.
Creating a new user
To create a new user, use the New-MsolUser cmdlet. The following is an example of the cmdlet in use:
New-MsolUser -UserPrincipalName john@litwareinc.com -DisplayName "John Doe" -FirstName "John" -LastName "Doe"
Assigning a user a license
When you first create a user, that users doesn’t have a license assigned to them and therefore cannot access SharePoint Online. To assign the use a license you must use the Set-MsolUserLicense cmdlet. However, first you must get the license key you want to assign them through the Get-MsolAccountSku cmdlet. Notice in the figure below the Get-MsolAccountSku cmdlet will return all the licenses you have purchased (ActiveUnits) along with how many of those licenses have been already allocated to users (ConsumedUnits).
5-15.bmp

With this information available you can run the Set-MsolUserLicense cmdet. Use the AddLicenses parameter to assign a license, and use the RemoveLicenses parameter to remove a license. This can be seen in the example below:
Set-MsolUserLicense -UserPrincipalName user@litwareinc.onmicrosoft.com -AddLicenses "litwareinc: ENTERPRISEPACK" -RemoveLicenses "litwareinc:SHAREPOINTSTANDARD"
Note You can only assign one license to any given user. If you want to upgrade a user’s license, first remove the one they currently have, and then add the new license you want to give them.
Removing a user
You can remove a user by using the Remove-MsolUser cmdlet, as can be seen below:
Remove-MsolUser -UserPrincipalName john@litwareinc.onmicrosoft.com
Resetting a user’s password
Quite commonly users will forget their passwords and they’ll need an administrator to reset it for them. Resetting passwords with PowerShell is quite easy. Simply use the Set-MsolUserPassword cmdlet. Set the NewPassword property if you want to specify a specific password to assign them. You have the option to use the ForceChangePassword property if you don’t want to require the user to change the password when they first log in. If you don’t use the NewPassword property the user will be assigned system generated password. In either case, the user will receive an email with their password after you run the cmdlet.
Set-MsolUserPassword -userPrincipalName john@litwareind.onmicrosoft.com
    -NewPassword "password" -ForceChangePassword $false
Blocking a user
To block a user from accessing Office 365 or SharePoint Online, without permanently deleting the user, use the Set-MsolUser cmdlet and set the BlockCredential property to true:
Set-MsolUser -UserPrincipalName user@ litwareinc.onmicrosoft.com -blockcredential $true
Disabling password expiration for a user
By default all passwords will expire after 90 days. To disable this for a given user use the Set-MsolUser cmdlet and set the PasswordNeverExpires property to true:
Set-MsolUser -UserPrincipalName user@ litwareinc.onmicrosoft.com
    -PasswordNeverExpires $true
Disabling strong password strength requirements
By default all passwords must meet a certain level of complexity. You can disable these complexity requirements on a case by case basis with the Set-MsolUser cmdlet. Simply set the StrongPasswordRequired property to true:
Set-MsolUser -UserPrincipalName user@litwareinc.onmicrosoft.com
    -StrongPasswordRequired $true
Adding a new security group
Security groups in Office 365 are helpful for SharePoint Online users because they can be uses across multiple site collections. SharePoint Groups can only be using in a single site collection, so if you want to manage authentication across more than one site collection a Office 365 security group can be helpful. To create a new group, simply use the New-MsolGroup cmdlet:

New-MsolGroup -DisplayName "Sales Executives" -Description "All sales staff"

Adding users to a security group
To add a user to a group, you can use the Add-MsolGroupMember cmdlet. The problem however is this cmdlet requires a handle to the group you want to add the user to, and to get a handle to that group you first must use the Get-MsolGroup cmdlet and search on the group’s display name:
$salesGroup = Get-MsolGroup | where-object { $_.DisplayName -eq "Sales Executives"}
Note You can use the “SearchString” parameter rather than the where-object option to make searching for a group or user easier, however it may return more than one result, which you wouldn’t want.
After you have your group assigned to a variable you’ll also want a handle on the user you want to add to that group, for example:
$user = Get-MsolUser | where-object { $_.DisplayName -eq "Phil" }
Hereafter can use the Add-MsolGroupMember cmdlet and add a user to that group, for example:
Add-MsolGroupMember -GroupObjectId $salesGroup.ObjectId -GroupMemberType "User"
    -GroupMemberObjectId $user.ObjectId
Deleting a security group
To delete a security group, simply use the Remove-MsolGroup cmdlet, as can be seen below:
Remove-MsolGroup -objectid $salesGroup.ObjectId

Useful Exchange Online and Office365 cmdlet

Copied from Blog : http://gsexdev.blogspot.com/2011/07/running-exchange-online-and-office-365.html

Running Exchange Online and Office365 Powershell cmdlets in C# and managed code

When you’re looking at automating Office365 and Exchange Online from managed code you need to be aware of the 2 sets of cmdlets that you may need to use depending on the tasks that your trying to perform. Most of the administration of ExchangeOnline is done using remote powershell where Exchange Online provides a subset of the normal on-premise Exchange 2010 SP1 cmdlets. The other cmdlet set to be aware of is the MSOnline powershell module which you need download and install http://onlinehelp.microsoft.com/en-us/office365-enterprises/hh124998.aspx. The MSOnline module contains cmdlets to allow administration of the wider Office365 service and perform more of the directory/service and service provider functions more akin to Active directory management in a on premise environment (eg adding users to groups etc).

So when using this from Managed code to use Remote powershell against Exchange Online you use the standard code you would use against an on-premise Exchange 2010 deployment against the endpoint https://ps.outlook.com. With the Office365 MSOnline module you need to load this into a runspace and then firstly use the Connect-MsolService cmdlet to connect to and authenticate against Office365. Then you execute as per normal the desired cmdlets.

Here's some sample code the first sample uses remote powershell to connect to ExchangeOnline.

System.Security.SecureString secureString = new System.Security.SecureString();
string myPassword = "password";
foreach (char c in myPassword)
secureString.AppendChar(c);
PSCredential credential = new PSCredential("glen@domain.com", secureString);
WSManConnectionInfo connectionInfo = new WSManConnectionInfo(new Uri("https://ps.outlook.com/PowerShell-LiveID?PSVersion=2.0"), "http://schemas.microsoft.com/powershell/Microsoft.Exchange", credential);
connectionInfo.AuthenticationMechanism = AuthenticationMechanism.Basic;
connectionInfo.SkipCACheck = true;
connectionInfo.SkipCNCheck = true;

connectionInfo.MaximumConnectionRedirectionCount = 4;
Runspace runspace = System.Management.Automation.Runspaces.RunspaceFactory.CreateRunspace(connectionInfo);
runspace.Open();
// Make a Get-Mailbox requst using the Server Argument
Command gmGetMailbox = new Command("get-mailbox");
gmGetMailbox.Parameters.Add("ResultSize", "Unlimited");
Pipeline plPileLine = runspace.CreatePipeline();
plPileLine.Commands.Add(gmGetMailbox);
Collection RsResultsresults = plPileLine.Invoke();
Dictionary gmResults = new Dictionary();
foreach (PSObject obj in RsResultsresults)
{
gmResults.Add(obj.Members["WindowsEmailAddress"].Value.ToString(), obj);
}
plPileLine.Stop();
plPileLine.Dispose();

This second example loads the MSOnline powershell module into a runspace

InitialSessionState iss = InitialSessionState.CreateDefault();
iss.ImportPSModule(new[] { "MSOnline" });
using (Runspace psRunSpace = RunspaceFactory.CreateRunspace(iss))
{
psRunSpace.Open();
using (System.Management.Automation.PowerShell powershell = System.Management.Automation.PowerShell.Create())
{
powershell.Runspace = psRunSpace;
Command connect = new Command("Connect-MsolService");
System.Security.SecureString secureString = new System.Security.SecureString();
string myPassword = "password";
foreach (char c in myPassword)
secureString.AppendChar(c);

connect.Parameters.Add("Credential", new PSCredential("glen@domain.com", secureString));
powershell.Commands.AddCommand(connect);
Collection results = null;
Collection errors = null;
results = powershell.Invoke();
errors = powershell.Streams.Error.ReadAll();
powershell.Commands.Clear();
Command getuser = new Command("Get-MsolUser");
getuser.Parameters.Add("MaxResults", 100);
powershell.Commands.AddCommand(getuser);
results = null;
errors = null;
results = powershell.Invoke();
}
}
}

Thursday, March 8, 2012

Cmdlet - Q & A

Reference : http://stackoverflow.com/questions/1111654/what-is-a-powershell-cmdlet

A PowerShell cmdlet is a compiled piece of .NET code, more precisely a single class if I am not mistaken. Cmdlets are kind of the "native" commands in PowerShell land, being able to handle object input and output as well as usually playing nice and well with the (object-based) pipeline.
Cmdlets have no direct representation in the file system, as they are not programs or similar. They exist solely within PowerShell. You can use the Get-Command cmdlet to query all available cmdlets, functions, etc.
You can write cmdlets with a .NET language, such as C#. With PowerShell v2 there is also the possibility to write so-called advanced functions which behave similarly to cmdlets and have comparable capabilities but are interpreted PowerShell code, instead of compiled classes. This may incur a run-time overhead.

Useful Links:
===========
* Powershell Tutorials - Link
 http://www.powershellpro.com/powershell-tutorial-introduction/tutorial-powershell-cmdlet/

* Cmdlets overview - Link
http://msdn.microsoft.com/en-us/library/windows/desktop/ms714395%28v=vs.85%29.aspx

* Tutorials for writing a cmdlet - Link
http://msdn.microsoft.com/en-us/library/windows/desktop/dd878321%28v=vs.85%29.aspx

* Commonly used cmdlets for Administrator - Link
http://www.computeranthem.com/powershell-20-tutorial-part-vi

* Reflector to view compiled code -
http://www.nivot.org/post/2008/10/30/ATrickToJumpDirectlyToACmdletsImplementationInReflector.aspx


Purpose :
Get list of all cmdlets available for PowerShell (PS) -  Link
http://technet.microsoft.com/library/ee176842.aspx

Wednesday, March 7, 2012

Windows Azure - http://ignatiuz.com/blogs/

$cert = New-Object System.Security.Cryptography.X509Certificates.X509Certificate2("c:\your_token_signing.cer")
 
$map1 = New-SPClaimTypeMapping "http://schemas.xmlsoap.org/ws/2005/05/identity/claims/emailaddress" -IncomingClaimTypeDisplayName "Email" -SameAsIncoming
 
$realm = "your-realm"
 
 
New-SPTrustedIdentityTokenIssuer -Name "Azure ACS" -Description "Windows Azure ACS v2" -Realm $realm -ImportTrustCertificate $cert -ClaimsMappings $map1 -SignInUrl $signinurl -IdentifierClaim $map1.InputClaimType
 
New-SPTrustedRootAuthority -Name "Azure Test Token Signing" -Certificate $cert

Tuesday, March 6, 2012

Overview of Domain Name registration and DNS Hosting Service

Refer to Office 365 documentation : http://help.outlook.com/en-us/140/cc188658.aspx

Domain Name Registration and DNS Hosting Services

Applies to: Office 365 for professionals and small businesses, Office 365 for enterprises, Live@edu
Topic Last Modified: 2011-05-19
Before you enroll your organization, you need to know some basic information about DNS, domain registrars, and DNS hosting services.
Here's a quick explanation of DNS, the difference between domain registrars and domain hosting services, and how to find the domain registrar or DNS hosting service for your domain if you don't already know.

DNS (Domain Name System)

DNS is responsible for translating friendly domain names, such as www.microsoft.com, to IP addresses, such as 192.168.255.255. These IP addresses are required to access resources on the Internet.
Domain information is stored in DNS servers on the Internet. These DNS servers are used to look up the resource records that are defined for a domain. The resource records then point to an IP address so that the resources, such Web servers or messaging servers, can be accessed.
Before you can use your domain name on the Internet, you have to engage with two separate entities that manage domain information: a domain registrar and a DNS hosting service. Frequently, the domain registrar is also the DNS hosting service. However, this isn't always true.
Top of page

Domain registrars

A domain registrar is a company that registers domain names. Everyone, from an individual to an international corporation, must use a domain registrar to register their domain name before they can use it on the Internet. All domain registrars must be certified by the Internet Corporation for Assigned Names and Numbers (ICANN). When you search for an available domain name at a particular domain registrar, you are really searching for the availability of that domain name from all the domain registrars in the world.
Typically, domains are registered in yearly increments. Domain registrations can be transferred from one domain registrar to another. If the domain registration isn't renewed, the domain name becomes publicly available.
The domain registrar is responsible for maintaining the following information about the domain:
  • The registration status of the domain name: Is it registered?
  • Contact information for the person or organization that is responsible for the domain name.
  • Details about the domain registration, such as when the domain registration expires.
  • The names of at least two DNS servers that are responsible for the DNS records that are associated with the domain. These DNS servers are called the authoritative name servers. Even though the domain registrar is responsible for identifying the authoritative name servers for a domain, the domain registrar isn't responsible for hosting the DNS records for the domain.

Find the domain registrar for a registered domain

  1. Go to the InterNIC Web site at http://www.internic.com.
  2. Click Whois. In the Whois field, type your domain name, such as contoso.com.
  3. Select Domain, and then click Submit.
  4. The Whois Search Results page opens. In the results for your domain name, look for the company name in the Registrar field.
If the Whois Search Results page returns no results for the domain name, the domain name isn't registered, or the InterNIC Whois search can't retrieve information for that particular top-level domain. The InterNIC Whois page clearly states the top-level domains that it knows about. To find domain registrar information about other top-level domains, such as domains ending in .us or other country-code top-level domains, go to Uwhois.com at http://www.uwhois.com.
Top of page

DNS hosting services

The DNS hosting service is the company that owns the DNS servers that contain the DNS records for a domain. Some domain registrars provide DNS hosting services as part of their domain registration; other domain registrars don't provide DNS hosting services. Unlike domain names that must be registered with accredited domain registrars, any individual or company with a registered domain name and public IP addresses can create a public DNS server and host the DNS records for any number of domains. When the DNS records for a domain are hosted by a DNS hosting service, you and the rest of the Internet can actually use the domain.
Some DNS hosting companies let you create and modify the DNS records for your domain. Other DNS hosting companies don't let you directly modify the DNS records for your domain. Also, not all DNS hosting services support all kinds of DNS records. For example, some DNS hosting services don't support TXT records or SRV records.

A comparison of DNS hosting services

The following table describes the DNS hosting services of some popular domain registrars.
Domain registrar DNS hosting services? Owner can modify DNS records? Supported DNS record types related to the cloud-based service
1&1YesYes
  • CNAME
  • MX
CentralNicYesYes
  • CNAME
  • MX
  • TXT
eNom CentralYesYes
  • CNAME
  • MX
  • TXT
  • SRV
Go Daddy.comYesYes
  • CNAME
  • MX
  • TXT
  • SRV
MelbourneITYesYes
  • CNAME
  • MX
  • TXT
Network SolutionsYesYes
  • CNAME
  • MX
  • TXT
  • SRV
Note   SRV records are supported, but you must select values from a pre-defined list.
Register.comYesYes
  • CNAME
  • MX
  • TXT
  • SRV
Yahoo!YesYes
  • CNAME
  • MX
Top of page

Find the DNS hosting service for a registered domain

  1. Go to the InterNIC Web site at http://www.internic.com.
  2. Click Whois. In the Whois field, type your domain name, such as contoso.com.
  3. Select Domain, and then click Submit.
  4. The Whois Search Results page opens. In the results for your domain name, look for the value in the Name Server fields. The name servers that are listed are the authoritative name servers for your domain. For example, the authoritative name servers for the domain "fabrikam.com" may be "ns1.contoso.com" and "ns2.contoso.com". The name servers are listed in the order of priority.
  5. Copy and paste the value of the first Name Server field into the Search again field at the top of the page.
  6. Select Nameserver, and then click Submit. The owner of the name server is displayed in the Registrar field.
To find DNS hosting service information for other domains, such as domains ending in .us or other country-code top-level domains, see http://www.uwhois.com.

Wednesday, February 29, 2012

Office 365 Federation

IdP Initiated Authentication with Office 365 : Link

SSO Configuration against Office 365 : Link

Setup SSO against Office 365 : Link

Manage SSO - Link

MSF Remote Connectivity Analyzer - Link 

Thursday, February 23, 2012

Active Directory

Architecture White Paper - http://technet.microsoft.com/en-us/library/bb727030.aspx

How to uniquely identify an user in a forest across domains :

Security IDs (SIDs)
A security identifier (SID) is a unique number created by the security subsystem of the Windows 2000 operating system, and assigned to security principal objects, that is, to user, group, and computer accounts. Every account on your network is issued a unique SID when that account is first created. Internal processes in the Windows 2000 operating system refer to an account's SID rather than to the account's user or group name.
Each Active Directory object is protected by access control entries (ACEs) that identify which users or groups can access that object. Each ACE contains the SID of each user or group who has permission to access that object and defines what level of access is allowed. For example, a user might have read-only access to certain files, read-and-write access to others, and no access to others.
If you create an account, delete it, and then create an account with the same user name, the new account does not have the rights or permissions previously granted to the old account, because the accounts have different SID numbers.


User Principal Name
In Active Directory, each user account has a user principal name (UPN) in the format <user>@<DNS-domain-name>. A UPN is a friendly name assigned by an administrator that is shorter than the LDAP distinguished name used by the system and easier to remember. The UPN is independent of the user object's DN, so a user object can be moved or renamed without affecting the user logon name. When logging on using a UPN, users no longer have to choose a domain from a list on the logon dialog box.
The UPN's three parts are the UPN prefix (user logon name), the @ character, and the UPN suffix (usually, a domain name). The default UPN suffix for a user account is the DNS name of the Active Directory domain where the user account is located9. For example, the UPN for user John Doe, who has a user account in the OrgName.com domain (if OrgName.com is the only domain in the tree), is JDoe@OrgName.com.The UPN is an attribute (userPrincipalName) of the security principal object. If a user object's userPrincipalName attribute has no value, the user object has a default UPN of userName@DnsDomainName.
If your organization has many domains forming a deep domain tree, organized by department and region, default UPN names can become unwieldy. For example, the default UPN for a user might be sales.westcoast.microsoft.com. The logon name for a user in that domain is user@sales.westcoast.microsoft.com. Instead of accepting the default DNS domain name as the UPN suffix, you can simplify both administration and user logon processes by providing a single UPN suffix for all users. (The UPN suffix is used only within the Windows 2000 domain and is not required to be a valid DNS domain name.) You can choose to use your e-mail domain name as the UPN suffix—userName@companyName.com. This gives the user in the example the UPN name of user@microsoft.com.
For a UPN–based logon, a global catalog may be necessary, depending on the user logging on, and the domain membership of the user's computer. A global catalog is needed if the user logs on with a non-default UPN and the user's machine account is in a different domain than the user's user account. That is, if, instead of accepting the default DNS domain name as the UPN suffix (as in the example just given, user@sales.westcoast.microsoft.com), you provide a single UPN suffix for all users (so that the user then becomes simply user@ microsoft.com), a global catalog is required for logon.
You use the Active Directory Domains and Trusts tool to manage UPN suffixes for a domain. UPNs are assigned at the time a user is created. If you have created additional suffixes for the domain, you can select from the list of available suffixes when you create the user or group account. The suffixes appear in the list in the following order:
  • Alternate suffixes (if any; last one created appears first).
  • Root domain.
  • The current domain.

SAM Account Name
A Security Account Manager (SAM) account name is required for compatibility with Windows NT 3.x and Windows NT 4.0 domains. The Windows 2000 user interface refers to the SAM account name as the "User logon name (pre-Windows 2000)."
SAM account names are sometimes referred to as flat names because—unlike DNS names—SAM account names do not use hierarchical naming. Because SAM names are flat, each one must be unique in the domain.


LDAP URL Names
Active Directory supports access using the LDAP protocol from any LDAP-enabled client. RFC 1959 describes a format for an LDAP Uniform Resource Locator (URL) that lets Internet clients have direct access to the LDAP protocol. LDAP URLs are also used in scripting. An LDAP URL begins with the prefix "LDAP," and then it names the server holding Active Directory services followed by the attributed name of the object (the distinguished name). For example:
LDAP://server1.USRegion.OrgName.com/cn=JDoe,ou=Widgets,ou=Manufacturing,dc=USRegion,dcOrgName,dc=com

LDAP-based Active Directory Canonical Names
By default, Active Directory administrative tools display object names using the canonical name format, which lists the RDNs from the root downward and without the RFC 1779 naming attribute descriptors (dc=, ou=, or cn=). The canonical name uses the DNS domain name format, that is, the constituents of the domain labels section of the name are separated by periods—USRegion.OrgName.com. Table 3 contrasts the LDAP DN with the same name in canonical name format.

LDAP DN format contrasted with the canonical name format
Same Name in Two Formats
LDAP DN Name: cn=JDoe,ou=Widgets,ou=Manufacturing,dc=USRegion,dcOrgName.dc=com
Canonical Name: USRegion.OrgName.com/Manufacturing/Widgets/JDoe

Object GUIDs
In addition to its LDAP DN, every object in Active Directory has a globally unique identifier (GUID), a 128-bit number assigned by the Directory System Agent when the object is created. The GUID, which cannot be altered or removed, is stored in an attribute, objectGUID, which is a required attribute for every object. Unlike a DN or RDN, which can be changed, the GUID never changes.
When storing a reference to an Active Directory object in an external store (for example, a Microsoft SQL Server™ database), the objectGUID value should be used.