Copy-Pasted from the following link:
http://360on365.com/2011/03/04/how-to-federate-your-domain-with-office365/
To solve this issue you should give the AD users a User Principle Name (UPN) suffix that matches the domain you want to federate. For example user@fabrikam.com. A best practice is to use the users emailaddress as his/her UPN. Don’t underestimate this step. Depending on your current environment this will be a separate project.
After AD preparation we continue with the creation of a DNS record for the #ADFS2.0 server. In the internal DNS zone of fabrikam.com, create a host record called ‘sts’ which points to your #ADFS2.0 Server.
Now the preparations are done, we are going to install ADFS2.0. In the Server Manager of Windows Server 2008 R2 you also find a version of ADFS, this is however an old version and should not be used in conjunction with #Office365. You can download the correct version here. After downloading the package, run AdfsSetup.exe. After the License agreement page, you’re asked if you want this to be a Federation or Federation Proxy server. The federation server/farm will be installed on the internal network and the proxy server will be placed in the DMZ. So in our situation we choose for the Federation server and proceed with the automatic installation of the following prerequisites:

Before we configure ADFS, we have to create a new domain certificate for ‘sts.fabrikam.com’ and assign it to the default web site on the ADFS server using IIS Manager.
After we’ve done this, it’s time to configure Active Directory Federation Services 2.0. To do this we will follow these steps:
1. Open ADFS 2.0 Management Console
2. In the results pane click on “ADFS 2.0 Federation Server Configuration Wizard”
3. Choose for “Create a new Federation Service”
4. Choose the type of deployment, Farm or Stand-Alone server.
Note: Always use a ADFS Farm in a production environment. When you use a Stand-Alone server you create a hugh single point of failure!
5. Now verify that the correct SSL certificate (the one just created) and Federation Service name (equal to the common name of the certificate) are specified.
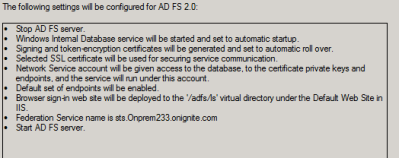
The wizard will show a list of changes like the one shown below:
After we’ve run the wizard we’ve partly configured ADFS. To fully configure ADFS for use with Office 365 the “Microsoft
Online Services Identity Federation Management Tool” and “Microsoft
Online Services Connector” need to be installed on the ADFS Server.
- The 32-bit version of the identity Federation Management tool can be downloaded here, the 64-bit version here.
- The “Microsoft Online Services Connector” can be downloaded from the Office 365 Beta tenant. (you need your own Beta account for it).
Install both tools and let the ”Services Connector” update your system. After this step all the preparations are done on the on-premise environment and we can commence the actual federation with Office 365.
The below steps will create a new domain in Office 365 and federate it:
1. Open the Microsoft Online Services Identity Federation Management Tool
2. In the PowerShell window enter: $cred = get-credential (this will show a prompt to enter Office 365 credentials)
3. Enter the Office 365 Admin credentials in the prompt which you want the tool to use for the connection to Office 365
4. Enter: ”Set-MSOLContextCredential -MSOLAdminCredentials $cred” into the tool
5. Then enter: “Add-MSOLFederatedDomain -DomainName “yourdomain.com”
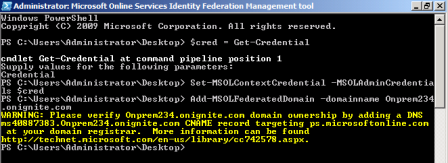
You will see a warning like the one below:

The domain name is now created in Office 365 but it isn’t working yet. First you have to verify that you are the owner of the domain.
This can be done by creating the CNAME record that is shown in the warning you get when performing the 5th step (like the one in the picture above) and point it to ps.microsoftonline.com.
6. Create the CNAME Record in DNS
7. Go back to the Identity Federation Management tool
8. Enter: “Add-MSOLFederatedDomain -DomainName “yourdomain.com” again.
The command in step 8 will read the CNAME record and verify the domainownership. After the domain ownership is verified the domain is federated.
If you would like to review the configuration you can use this command:
Get-MSOLFederationProperty -DomainName “yourdomain.com”
If you already have your domain added to Office365 you have to convert your domain to a federated domain. This can be done by following these steps:
1. Open the Microsoft Online Services Identity Federation Management Tool
2. In the PowerShell window enter: $cred = get-credential (this will show a prompt to enter Office 365 credentials)
3. Enter the Office 365 Admin credentials in the prompt which you want the tool to use for the connection to Office 365
4. Enter: “Set-MSOLContextCredential -MSOLAdminCredentials $cred” into the tool
5. Then enter: “Convert-MSOLDomainToconverFederated -DomainName “YourdomaininOffice365.com”
After running this command the domain will be changed from a standard authentication to a Federated authentication domain.
This can also be reviewed using the “Get-MSOLFederationProperty” cmdlet.
Have fun federating your domain with Office 365!
http://360on365.com/2011/03/04/how-to-federate-your-domain-with-office365/
HOW TO: Federate your domain with #Office365
In the last posts we talked about the enduser experience when using federation. But how do we ‘Administrators’ set it up? Before you start clicking you should remember one very important thing and that is the Active Directory preparation. A lot of companies have their Active Directory domain ending on .local or some variation to that. When you want to federate with #Office 365, your users can’t logon with that domain name. Because domain.local is not resolvable on the internet.To solve this issue you should give the AD users a User Principle Name (UPN) suffix that matches the domain you want to federate. For example user@fabrikam.com. A best practice is to use the users emailaddress as his/her UPN. Don’t underestimate this step. Depending on your current environment this will be a separate project.
After AD preparation we continue with the creation of a DNS record for the #ADFS2.0 server. In the internal DNS zone of fabrikam.com, create a host record called ‘sts’ which points to your #ADFS2.0 Server.
Now the preparations are done, we are going to install ADFS2.0. In the Server Manager of Windows Server 2008 R2 you also find a version of ADFS, this is however an old version and should not be used in conjunction with #Office365. You can download the correct version here. After downloading the package, run AdfsSetup.exe. After the License agreement page, you’re asked if you want this to be a Federation or Federation Proxy server. The federation server/farm will be installed on the internal network and the proxy server will be placed in the DMZ. So in our situation we choose for the Federation server and proceed with the automatic installation of the following prerequisites:

Before we configure ADFS, we have to create a new domain certificate for ‘sts.fabrikam.com’ and assign it to the default web site on the ADFS server using IIS Manager.
After we’ve done this, it’s time to configure Active Directory Federation Services 2.0. To do this we will follow these steps:
1. Open ADFS 2.0 Management Console
2. In the results pane click on “ADFS 2.0 Federation Server Configuration Wizard”
3. Choose for “Create a new Federation Service”
4. Choose the type of deployment, Farm or Stand-Alone server.
Note: Always use a ADFS Farm in a production environment. When you use a Stand-Alone server you create a hugh single point of failure!
5. Now verify that the correct SSL certificate (the one just created) and Federation Service name (equal to the common name of the certificate) are specified.
The wizard will show a list of changes like the one shown below:
- The 32-bit version of the identity Federation Management tool can be downloaded here, the 64-bit version here.
- The “Microsoft Online Services Connector” can be downloaded from the Office 365 Beta tenant. (you need your own Beta account for it).
Install both tools and let the ”Services Connector” update your system. After this step all the preparations are done on the on-premise environment and we can commence the actual federation with Office 365.
The below steps will create a new domain in Office 365 and federate it:
1. Open the Microsoft Online Services Identity Federation Management Tool
2. In the PowerShell window enter: $cred = get-credential (this will show a prompt to enter Office 365 credentials)
3. Enter the Office 365 Admin credentials in the prompt which you want the tool to use for the connection to Office 365
4. Enter: ”Set-MSOLContextCredential -MSOLAdminCredentials $cred” into the tool
5. Then enter: “Add-MSOLFederatedDomain -DomainName “yourdomain.com”
You will see a warning like the one below:

The domain name is now created in Office 365 but it isn’t working yet. First you have to verify that you are the owner of the domain.
This can be done by creating the CNAME record that is shown in the warning you get when performing the 5th step (like the one in the picture above) and point it to ps.microsoftonline.com.
6. Create the CNAME Record in DNS
7. Go back to the Identity Federation Management tool
8. Enter: “Add-MSOLFederatedDomain -DomainName “yourdomain.com” again.
The command in step 8 will read the CNAME record and verify the domainownership. After the domain ownership is verified the domain is federated.
If you would like to review the configuration you can use this command:
Get-MSOLFederationProperty -DomainName “yourdomain.com”
If you already have your domain added to Office365 you have to convert your domain to a federated domain. This can be done by following these steps:
1. Open the Microsoft Online Services Identity Federation Management Tool
2. In the PowerShell window enter: $cred = get-credential (this will show a prompt to enter Office 365 credentials)
3. Enter the Office 365 Admin credentials in the prompt which you want the tool to use for the connection to Office 365
4. Enter: “Set-MSOLContextCredential -MSOLAdminCredentials $cred” into the tool
5. Then enter: “Convert-MSOLDomainToconverFederated -DomainName “YourdomaininOffice365.com”
After running this command the domain will be changed from a standard authentication to a Federated authentication domain.
This can also be reviewed using the “Get-MSOLFederationProperty” cmdlet.
Have fun federating your domain with Office 365!

No comments:
Post a Comment